Ray
ray creates a ray-traced image of the current frame.

Details
This command is used to make high-resolution photos fit for publication and formal movies. Please note, the ray command can take some time (up to several minutes, depending on image complexity and size).
For those who are making movies with PyMOL, Ray is one of the most commonly used last steps before stitching the frames together to compile the movie. Ray has many powerful features such as setting the size of the image -- and it still works even if the Viewport or screen is smaller than the requested output file dimensions.


Usage
ray [width,height [,renderer [,angle [,shift ]]]
angle and shift can be used to generate matched stereo pairs
width and height can be set to any non-negative integer. If both are set to zero than the current window size is used and is equivalent to just using ray with no arguments. If one is set to zero (or missing) while the other is a positive integer, then the argument set to zero (or missing) will be scaled to preserve the current aspect ratio.
PyMol API
cmd.ray(int width,int height,int renderer=-1,float shift=0)
Settings
Modes
Setting the Ray_trace_mode variable in PyMOL changes the way PyMOL's internal renderer represents proteins in the final output. New modes were recently added to give the user more options of molecular representation. New modes are: normal rendering, but with a black outline (nice for presentations); black and white only; quantized color with black outline (also, very nice for presentations; more of a cartoony appearance).
Note: Mode 3, the quantized color one, sort of burns the background if you're using this setting. This will make a pure white background somewhat "offwhite"; thus, a poster would look poor because you could see the border for the image. If you'll be using this mode, try the ray_opaque_background setting.
# normal color
set ray_trace_mode, 0

# normal color + black outline
set ray_trace_mode,  1

# black outline only
set ray_trace_mode,  2

# quantized color + black outline
set ray_trace_mode,  3

set ray_trace_mode, 1 # (or 2 or 3; best with "bg_color white;set antialias,2")
# These two new modes -- 2 and 3 -- are cool cartoon looking modes.

# change the color of the outline to a named color, or a hex-code
set ray_trace_color, magenta
set ray_trace_color, 0x0033ff
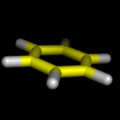
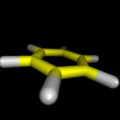
Here are the example images for the new modes
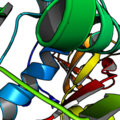
set ray_trace_mode,1
set ray_trace_mode,2
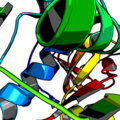
set ray_trace_mode,3


Perspective
Perspective Example Images
Example with Perspective Turned Off
Example with Perspective Turned On
Example with Perspective Turned On and Field of View Set High (70).


Notes
PyMol 0.97 and prior used orthoscopic rendering -- that is, no perspective. Upon the arrival of 0.98 and later, we get perspective based rendering at a cost of a 4x decrease in render speed. If you want perspective
set orthoscopic, off
Otherwise
set orthoscopic, on
To magnify the effect of perspective on the scene,
set field_of_view, X
where 50<X<70. Default is 20. 50-70 gives a very strong perspective effect. Nb. the field of view is in Y, not X as one would expect.
Renderer
renderer = -1 is default (use value in ray_default_renderer)
renderer = 0 uses PyMOL's internal renderer
renderer = 1 uses PovRay's renderer. This is Unix-only and you must have "povray" in your path. It utilizes two temporary files: "tmp_pymol.pov" and "tmp_pymol.png".
Performance
- The ray performance depends on distance between camera and molecule.
If the distance is big rendering takes much time. If the distance is too small distant parts of molecule dissolve.
Too close to molecule
Normal distance


- Tip: If you have a rather complicated scene that is zoomed into only a part of the molecule, you can speed up the ray tracing by hiding everything else outside of a certain range of the zoomed-on point. For example, if I have a large molecule and I'm looking only at the 30-atom ligand bound to it, then I can do something like the following:
# setup your complex scene
...

# zoom on the hetero atom (ligand and not water) within 5 Angstroms
select hh, het and not resn HOH
zoom hh, 5

# turn on depth cueing
set depth_cue, 1

# now, select stuff to hide; we select everything that is
# farther than 8 Ang from our main selection
select th, (all) and not ( (all) within 8 of hh) )

hide everything, th

# any additional commands you want
...

ray
As an example of the efficacy of this method, I ray traced a rather complex scene with all the atoms visible here's the output of ray:
PyMOL>ray
 Ray: render time: 24.50 sec. = 146.9 frames/hour (941.88 sec. accum.).
and here is the result when I soft-clipped everything else using the above method:
PyMOL>ray
 Ray: render time: 47.93 sec. = 75.1 frames/hour (989.80 sec. accum.).
The two images in the following gallery show the results of the rendering.
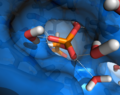
normal ray tracing. This took twice as long to make as the image to the right. Same size, and DPI.
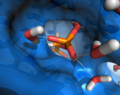
manually hiding things you won't see anyway. This took 1/2 the time to render as compared to the same sized & DPId image at left.


Memory
If memory is an issue for you in PyMOL, try executing your rendering from a script rather than a PyMOL session file. An unfortunate unavoidable consequence of the fact that we use Python's portable, platform-independent "pickle" machinery for PyMOL session files. Packing or unpacking a Session or Scene file thus requires that there be two simultanous copies of the information to reside in RAM simultaneously: one native and a second in Python itself.
So when memory is a limiting factor, scripts are recommended over sessions.
Examples
Simple
# ray trace the current scene using the default size of the viewport
ray
Specify Image Size
# ray trace the current scene, but scaled to 1024x768 pixels
ray 1024,768
Specify Renderer
# ray trace with an external renderer.
ray renderer=0
High Quality B&W Rendering

# Black and White Script
load /tmp/3fib.pdb;
show cartoon;
set ray_trace_mode, 2;  # black and white cartoon
bg_color white;
set antialias, 2;
ray 600,600
png /tmp/1l9l.png
High Quality Color

# Color Script
load /tmp/thy_model/1l9l.pdb;
hide lines;
show cartoon;
set ray_trace_mode, 3; # color
bg_color white;
set antialias, 2;
remove resn HOH
remove resn HET
ray 600,600
png /tmp/1l9l.png
Ray Tracing Stereo Images
- See Stereo_Ray
See also
- "help faster" for optimization tips with the builtin renderer. "help povray" for how to use PovRay instead of PyMOL's built-in ray-tracing engine. For high-quality photos, please also see the Antialias command. Ray shadows for controlling shadows.
- See also Ray Tracing.
- Desaturation Tutorial -- A good resource for making nice B&W images from color images (desaturation).
- Ray Trace Gain
User comments
- How do I ray trace a publication-ready (~300dpi) image using PyMol?
- This answer is in the Advanced Issues (Image Manipulation Section).