Difference between revisions of "Ray"
m |
m (Gallery. Cleaned up some stuff.) |
||
| Line 16: | Line 16: | ||
===SETTINGS=== | ===SETTINGS=== | ||
====Ray-Tracing modes==== | ====Ray-Tracing modes==== | ||
| + | <source lang="python"> | ||
ray_trace_mode = 0: normal color | ray_trace_mode = 0: normal color | ||
| Line 24: | Line 25: | ||
ray_trace_mode = 3: quantized color + black outline | ray_trace_mode = 3: quantized color + black outline | ||
| − | + | set ray_trace_mode, 1 # (or 2 or 3; best with "bg_color white;set antialias,2") | |
| − | These two new modes -- 2 and 3 -- are cool cartoon looking modes. | + | # These two new modes -- 2 and 3 -- are cool cartoon looking modes. |
| + | </source> | ||
Here are the example images for the new modes | Here are the example images for the new modes | ||
[[Image:1l9l.png|thumb|center|Black and White (ray_trace_mode,2); click to see full image]] | [[Image:1l9l.png|thumb|center|Black and White (ray_trace_mode,2); click to see full image]] | ||
| − | + | <source lang="python"> | |
| − | + | # Black and White Script | |
| − | + | load /tmp/3fib.pdb; | |
| − | + | show cartoon; | |
| − | + | set ray_trace_mode, 2; # black and white cartoon | |
| − | + | bg_color white; | |
| − | + | set antialias, 2; | |
| − | + | ray 600,600 | |
| − | + | png /tmp/1l9l.png | |
| + | </source> | ||
[[Image:1l9l_2.png|thumb|center|Color mode (ray_trace_mode,3); click to see full image]] | [[Image:1l9l_2.png|thumb|center|Color mode (ray_trace_mode,3); click to see full image]] | ||
| − | + | <source lang="python"> | |
| − | + | # Color Script | |
| − | + | load /tmp/thy_model/1l9l.pdb; | |
| − | + | hide lines; | |
| − | + | show cartoon; | |
| − | + | set ray_trace_mode, 3; # color | |
| − | + | bg_color white; | |
| − | + | set antialias, 2; | |
| − | + | remove resn HOH | |
| − | + | remove resn HET | |
| − | + | ray 600,600 | |
| − | + | png /tmp/1l9l.png | |
| − | + | </source> | |
| − | |||
| − | |||
| − | |||
| − | |||
==== Examples ==== | ==== Examples ==== | ||
| − | + | <gallery> | |
| − | + | Image:Ray_mode_1_ex.png|set ray_trace_mode,1 | |
| − | + | Image:Ray_mode_2_ex.png|set ray_trace_mode,2 | |
| − | + | Image:Ray_mode_3_ex.png|set ray_trace_mode,3 | |
| − | + | </gallery> | |
| − | |||
| − | |||
| − | |||
| − | |||
| − | |||
| − | |||
| − | |||
| − | |||
====Perspective==== | ====Perspective==== | ||
====Perspective Example Images==== | ====Perspective Example Images==== | ||
| − | + | <gallery> | |
| − | + | Image:No_persp.png|Example with Perspective Turned Off | |
| − | + | Image:Persp1.png|Example with Perspective Turned On | |
| − | + | Image:Persp2.png|Example with Perspective Turned On and Field of View Set High (70). | |
| − | + | </gallery> | |
| − | |||
| − | |||
| − | |||
| − | |||
| − | |||
| − | |||
| − | |||
| − | |||
| − | |||
| − | |||
=====Notes===== | =====Notes===== | ||
Revision as of 22:16, 20 July 2006
DESCRIPTION
ray creates a ray-traced image of the current frame. This can take some time (up to several minutes, depending on image complexity).
USAGE
ray [width,height [,renderer [,angle [,shift ]]]
angle' and shift can be used to generate matched stereo pairs
EXAMPLES
ray
ray 1024,768
ray renderer=0
PYMOL API
cmd.ray(int width,int height,int renderer=-1,float shift=0)
SETTINGS
Ray-Tracing modes
ray_trace_mode = 0: normal color

ray_trace_mode =  1: normal color + black outline

ray_trace_mode =  2: black outline only

ray_trace_mode =  3: quantized color + black outline

set ray_trace_mode, 1 # (or 2 or 3; best with "bg_color white;set antialias,2")
# These two new modes -- 2 and 3 -- are cool cartoon looking modes.
Here are the example images for the new modes

# Black and White Script
load /tmp/3fib.pdb;
show cartoon;
set ray_trace_mode, 2;  # black and white cartoon
bg_color white;
set antialias, 2;
ray 600,600
png /tmp/1l9l.png

# Color Script
load /tmp/thy_model/1l9l.pdb;
hide lines;
show cartoon;
set ray_trace_mode, 3; # color
bg_color white;
set antialias, 2;
remove resn HOH
remove resn HET
ray 600,600
png /tmp/1l9l.png
Examples
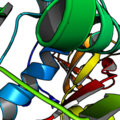
set ray_trace_mode,1
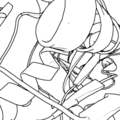
set ray_trace_mode,2
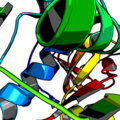
set ray_trace_mode,3


Perspective
Perspective Example Images
Example with Perspective Turned Off
Example with Perspective Turned On
Example with Perspective Turned On and Field of View Set High (70).


Notes
PyMol 0.97 and prior used orthoscopic rendering -- that is, no perspective. Upon the arrival of 0.98 and later, we get perspective based rendering at a cost of a 4x decrease in render speed. If you want perspective
set orthoscopic, off
Otherwise
set orthoscopic, on
To magnify the effect of perspective on the scene,
set field_of_view, X
where 50<X<70. Default is 20. 50-70 gives a very strong perspective effect. Nb. the field of view is in Y, not X as one would expect.
Renderer
renderer = -1 is default (use value in ray_default_renderer)
renderer = 0 uses PyMOL's internal renderer
renderer = 1 uses PovRay's renderer. This is Unix-only and you must have "x-povray" in your path. It utilizes two temporary files: "tmp_pymol.pov" and "tmp_pymol.png".
Ray Tracing Stereo Images
See Stereo_Ray.
SEE ALSO
"help faster" for optimization tips with the builtin renderer. "help povray" for how to use PovRay instead of PyMOL's built-in ray-tracing engine.
USER Comments
How do I ray trace a publication-ready (~300dpi) image using PyMol?
This answer is in the Advanced Issues (Image Manipulation Section).